
Git rebase and bisect
Rebase Operation: git rebase
git rebase can be understood as “changing the base of a branch from one commit to another, making it look as if the branch was created from another commit,” as shown in the image below:
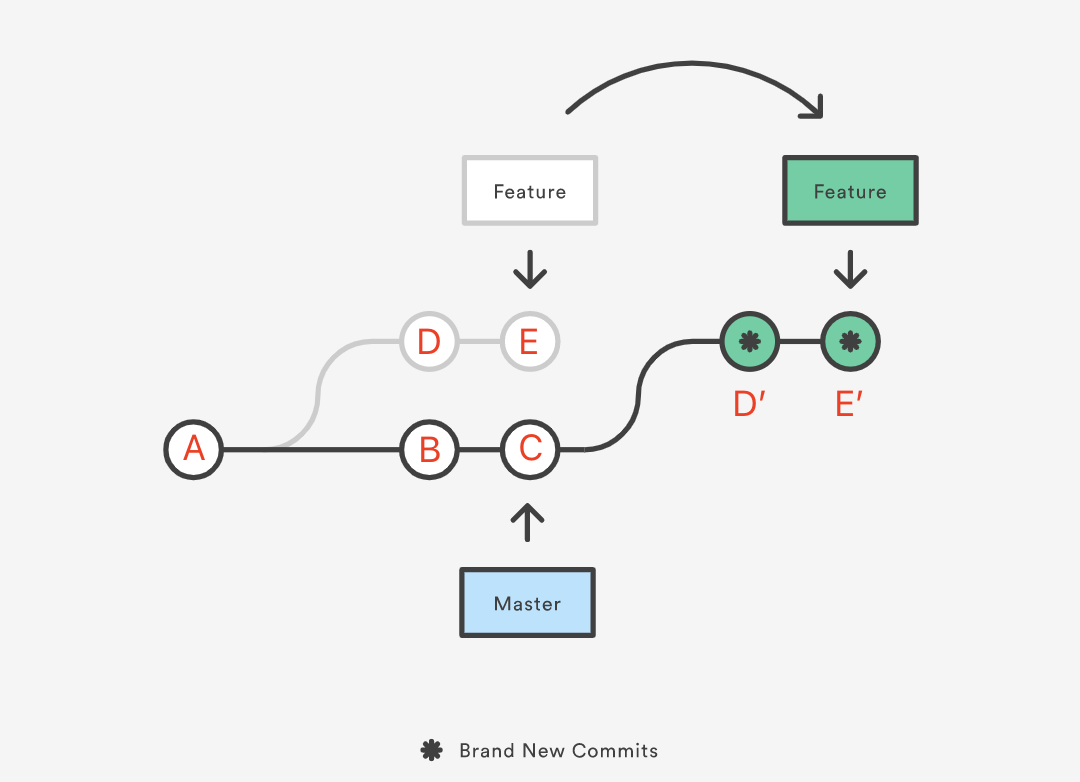
Assume we created a Feature branch from commit A on the Master branch for new feature development, making A the base of Feature. Later, Master added two new commits, B and C, while Feature added two commits, D and E. Now, for reasons like the new feature depending on commits B and C, we need to integrate Master‘s new commits into the Feature branch. To keep the commit history clean, we can switch to the Feature branch and perform the rebase operation:
1 | git rebase master |
The rebase process first finds the most recent common ancestor commit A of these two branches (the current branch Feature and the rebase target branch Master), then compares the current branch’s commits (D and E) relative to that ancestor. It extracts the corresponding changes, saves them as temporary files, then moves the current branch to the target base, commit C. Finally, it applies the saved changes in order, making commit C the new base for Feature.
You can think of it as changing the base of the Feature branch from commit A to commit C, making it look as if the branch was created from C and then D and E were committed. However, this is just an appearance; internally, Git copies the contents of commits D and E, creates new commits D’ and E’, and applies them on top of the new base (A→B→C). Although the new Feature branch looks the same as before, it consists of entirely new commits.
The essence of rebase is to discard some existing commits and create new ones with the same content but technically different.
Main Use Cases
Rebase is commonly used to rewrite commit history. The following scenario is typical in many Git workflows:
- We pull a
featurebranch from themasterbranch locally for development. - The remote
masterbranch receives new commits after this. - We want to integrate
master‘s latest changes into thefeaturebranch.
Difference Between rebase and merge
The above scenario can also be achieved using merge, but using rebase allows us to maintain a linear and cleaner commit history. Suppose we have the following branches:
1 | D---E feature |
Now, we will use both merge and rebase to integrate master branch commits B and C into the feature branch, then add a new commit F to the feature branch, and finally merge the feature branch into master. We will compare the commit histories created by both methods.
Using merge
- Switch to the
featurebranch:git checkout feature. - Merge updates from the
masterbranch:git merge master. - Add a new commit F:
git add . && git commit -m "commit F". - Switch back to the
masterbranch and fast-forward merge:git checkout master && git merge feature.
The process is shown below:

We will get the following commit history:
1
2
3
4
5
6
7
8
9* 6fa5484 (HEAD -> master, feature) commit F
* 875906b Merge branch 'master' into feature
|\
| | 5b05585 commit E
| | f5b0fc0 commit D
* * d017dff commit C
* * 9df916f commit B
|/
* cb932a6 commit A- Switch to the
Using rebase
The steps are the same as using
merge, except that in step 2, we replace the command with:git rebase master.The process is shown below:
We will get the following commit history:
1
2
3
4
5
6
* 74199ce (HEAD -> master, feature) commit F
* e7c7111 commit E
* d9623b0 commit D
* 73deeed commit C
* c50221f commit B
* ef13725 commit A
As you can see, the commit history formed using the rebase method is entirely linear, and compared to the merge method, it eliminates one merge commit, making the history cleaner.
Note
📌 Do not use rebase on public branches
📌 If the local and remote correspond to the same branch, prioritize using rebase instead of merge
Why Maintain a Clean Commit History
What are the benefits of having a cleaner commit history?
- It satisfies some developers’ obsession with tidiness.
- When you need to trace back through the commit history due to a bug, it’s easier to pinpoint the commit where the bug was introduced. This is especially helpful when using
git bisectto track down a bug from among dozens or even hundreds of commits, or when a large feature branch needs frequent updates from the remote main branch.
Using rebase to integrate remote changes into your local repository is a better choice. Pulling remote changes with merge results in an extra merge commit every time you fetch the latest project updates. But with rebase, the result better aligns with the intention: you want to apply your changes on top of the work that others have already completed.
Other Ways to Rewrite Commit History
When we only want to modify the most recent commit, using git commit --amend is more convenient.
This is useful in the following scenarios:
- You’ve just completed a commit but haven’t pushed it to a public branch yet.
- You suddenly realize the last commit left something incomplete, like a comment that should’ve been deleted or a small typo. You want to quickly fix it without creating a separate commit.
- Or, you just feel the previous commit message wasn’t good enough and want to edit it.
In this case, you can add the new changes (or skip adding anything), and run the git commit --amend command. This will open a new editor window where you can modify the last commit message. Once saved, the changes will be applied to the previous commit.
If you’ve already pushed the last commit to the remote branch, trying to push again will result in an error and rejection. If you’re sure this branch is not a public one, you can force-push using git push --force.
Note that just like rebase, Git doesn’t actually modify and replace the previous commit internally; instead, it creates a new commit and re-points the branch to this new commit.
Using Interactive Mode to Rewrite Commit History with Rebase
The git rebase command has two modes: standard and interactive. The previous examples used the default standard mode. To use interactive mode, add the -i or --interactive option.
Difference Between the Two Modes
As mentioned earlier, rebase means “reapplying commits on top of a new base.” During this reapplication process, the commits are recreated and can be modified. In standard mode, the commits from the current branch are directly applied to the top of the target branch. In interactive mode, we can use an editor and specific command rules to combine, reorder, or delete these commits before they are reapplied.
Thus, the most common use cases for each mode are different:
- Standard mode is typically used to integrate the latest changes from another branch into the current branch.
- Interactive mode is often used to edit the commit history of the current branch, such as combining multiple small commits into one larger commit.
Not Just for Branches
Although the previous examples involved rebase operations between different branches, the rebase command’s parameters are not limited to branches.
Any commit reference can serve as a valid rebase base object, including a commit ID, branch name, tag name, or a relative reference like HEAD~1.
Naturally, if we perform a rebase on a historical commit within the current branch, the result will reapply all commits made after that commit to the current branch. In interactive mode, this allows us to make changes to those commits.
Rewriting Commit History
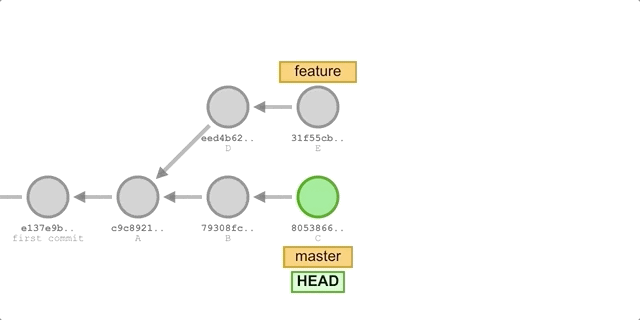
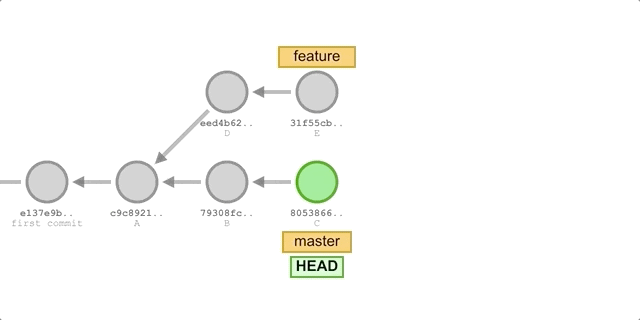
Now, we’re diving into the core topic of this article. As previously mentioned, performing a rebase on a particular commit in interactive mode indirectly allows you to rewrite all subsequent commits. Let’s walk through an example to illustrate this process.
Suppose the feature branch has the following commit history:
1 | 74199cebdd34d107bb67b6da5533a2e405f4c330 (HEAD -> feature) commit F |
The operations we’re going to perform are:
- Combine commits B and C into a new commit, keeping only the commit message from C.
- Delete commit D.
- Move commit E after commit F and rename it to commit H (i.e., modify its commit message).
- Add new file changes to commit F and rename it to commit G.
Since we need to modify commits B→C→D→E, we must choose commit A as the new “base” so that all commits after A will be reapplied:
1 | git rebase -i ef1372522cdad136ce7e6dc3e02aab4d6ad73f79 # The parameter is commit A’s ID |
This opens the following editor interface:
1 | pick c50221f commit B |
(Note that modifying the commit messages shown above won’t affect the actual commit history. The commit IDs and messages here are for reference only.)
The specific commands are clearly explained in the comments of the editor, so let’s proceed with the following steps:
For commits B and C, modify the following:
1
2pick c50221f commit B
f 73deeed commit CSince commit B is the first in this sequence, we cannot use the
squashorfixupcommands (there’s no previous commit to merge it into). We don’t need torewordcommit B because when we merge commit C into B, we’ll have the chance to modify the combined commit message.The order in this interface shows commits from oldest to newest, so modifying commit C with
s (or squash)orf (or fixup)will merge it into the preceding commit B. The difference between the two is whether or not to keep C’s commit message.To delete commit D, change the command as follows:
1
d d9623b0 commit D
Move commit E after F and modify its commit message:
1
2pick 74199ce commit F
r e7c7111 commit EAdd new file changes to commit F:
1
e 74199ce commit F
Save and exit.
Next, the rebase process will follow the order from top to bottom, applying each command to the respective commit:
The
pickcommand for commit B will be executed automatically, requiring no interaction.The
squashcommand for commit C will prompt a new editor interface where we can modify the combined commit message for B and C:1
2
3
4
5
6
7
8
9# This is a combination of 2 commits.
# The first commit message is:
commit B
# This is the commit message #2:
commit C
......Delete the
commit Bline and save. The merged commit will now usecommit Cas the message.The
dropoperation for commit D will be executed automatically without interaction.If any conflicts occur during the rebase, it will pause and prompt you to resolve them manually. After resolving conflicts, use
git add/rm <conflicted_files>to mark them as resolved, then rungit rebase --continueto proceed. Alternatively, usegit rebase --abortto cancel the rebase and revert to the pre-rebase state.Since we moved commit F, the next step will be to edit F. This will open a new shell session:
1
2
3
4
5
6
7
8Stopped at 74199ce... commit F
You can amend the commit now, use:
git commit --amend
When you are satisfied with your changes, run:
git rebase --continueAdd a new file and use
git commit --amendto merge the changes into F. Rename the commit tocommit Gin the editor and continue withgit rebase --continue.Finally, the
rewordoperation for commit E will prompt a new editor window where you can rename it tocommit H.
All done! Let’s verify the final commit history after the rebase:
1 | 64710dc88ef4fbe8fe7aac206ec2e3ef12e7bca9 (HEAD -> feature) commit H |
The result matches our expectations, and as we can see, all the commit IDs after commit A have changed, confirming that Git recreated these commits during the rebase.
Advanced Uses of Rebase
Performing rebase Before Merging
A common scenario for using rebase is to perform it locally before pushing to the remote repository for a merge. This is typically done to ensure a clean commit history.
After completing development on a feature branch, we often rebase the current branch onto the latest changes from the main branch, resolving any conflicts in advance. This allows the maintainer of the remote main branch to fast-forward the merge without creating an additional merge commit. Even in parallel development across multiple branches, this approach helps maintain a fully linear commit history.
Rebase to Another Branch
We can use rebase to compare two branches, extract the relevant changes, and apply them to another branch. For example:
1 | F---G patch |
Let’s say we created a patch branch from commit D on the feature branch and added commits F and G. Now, we want to apply the changes from the patch branch to master without merging feature yet. In this case, we can use the --onto <branch> option with rebase:
1 | git rebase --onto master feature patch |
This command will take the changes in the patch branch, which are based on the feature branch, and reapply them as if they were based directly on master. The result will look like this:
1 | A---B---C---F'---G' patch |
Now we can switch to the master branch and fast-forward merge the patch branch:
1 | git checkout master |
Using Rebase Strategy for git pull
In recent Git versions, running git pull without specifying a merge strategy may display a warning message:
1 | warning: Pulling without specifying how to reconcile divergent branches is discouraged. |
git pull can use rebase instead of the default merge. Since git pull is essentially git fetch followed by git merge, replacing the git merge step with git rebase avoids extra merge commits and maintains a linear commit history.
The usage of rebase here achieves the same effect we discussed earlier: keeping the commit history clean by reapplying the local changes on top of the fetched changes from the remote branch.
There are multiple ways to use this:
- Add the specific option during each pull:
git pull --rebase. - Set the configuration option for the current repository:
git config pull.rebase true. Use--globalto apply this setting to all repositories.
Potential Drawbacks and Opposition
Although rebase is a powerful tool in Git, it is not without risks, especially for newcomers. You might find that commits “disappear” from the git log or get stuck during the rebase process without knowing how to recover.
While rebase offers the advantage of maintaining a clean, linear commit history, there are potential downsides:
- If you have already pushed commits, you will need to force-push (
git push --force) after rebasing to update the remote repository with your rewritten history. Never performrebaseon a public branch that others are working on, as this can result in a confusing local history for others. When theypullthe changes, the history will be difficult to reconcile, potentially breaking the remote branch history (see Rebase and the golden rule explained). - Rebase is not very beginner-friendly. Mistakes during interactive rebase can lead to “lost” commits (though they are recoverable).
- Frequent rebasing of long-running feature branches might lead to more merge conflicts over time. While
rebaseallows resolving these conflicts, this can become tedious. A better approach is to merge the main branch frequently into the feature branch or create new, short-lived feature branches instead of maintaining one for an extended period.
Some argue that commit history should not be rewritten:
One perspective suggests that commit history represents what actually happened. It is a historical record with inherent value and should not be altered. From this view, rewriting history is a form of deception, as you hide what actually occurred. If the commit history looks messy due to merges, then that is how things truly unfolded, and these traces should be preserved for future reference.
Frequent use of rebase could also make it harder to track down bugs in historical commits, as discussed in Why you should stop using Git rebase.
Recovering Lost Commits
When performing an interactive rebase and executing commands like squash or drop, the affected commits are removed from the branch’s git log. If you make a mistake, it might seem as though the commits are permanently lost, which can cause panic.
However, these commits are not actually deleted. As mentioned earlier, Git does not modify (or delete) the original commits but instead creates new ones and updates the branch’s head to point to them. This means that you can use git reflog to find and reapply the original commits, effectively undoing the entire rebase. Thanks to Git’s design, even if you perform actions like rebase or commit --amend that rewrite history, no commits are truly lost.
The git reflog Command
Reflogs are a mechanism used by Git to record changes to the local repository’s branch head. They track every commit that the branch head has ever pointed to. Reflogs allow you to find and switch to commits that are no longer referenced by any branch or tag.
Each time the branch head is updated for any reason (like switching branches, pulling new changes, rewriting history, or adding new commits), a new record is added to the reflogs. This means every commit you make locally is recorded in the reflogs, and even after rewriting history, the reflogs will retain information about the previous state of the branch, allowing you to recover it if necessary.
Note that reflogs are not stored forever and typically expire after 90 days.
Restoring Commit History
Continuing from the previous example, let’s assume you want to restore the A→B→C→D→E→F commit history on the feature branch, which was altered during a rebase. However, these later commits have disappeared from the git log. To recover them, use git reflog to search for them. The result might look something like this:
1 | 64710dc (HEAD -> feature) HEAD@{0}: rebase (continue) (finish): returning to refs/heads/feature |
The reflogs command records the entire process of switching branches and performing the rebase. After scrolling down, we find the commit F that disappeared from the git log:
1 | 74199ce HEAD@{15}: commit: commit F |
Now we can use git reset to point the feature branch’s head back to the original commit F:
1 | # We want to restore the working directory as well, so we use the --hard option |
After running git log, everything is back to how it was before:
1 | 74199cebdd34d107bb67b6da5533a2e405f4c330 (HEAD -> feature) commit F |
Finding the Bug: git bisect
Let’s say you have a local repository with 101 commits, where the earliest commit has the hash 4d83cf. After encountering a bug in the code, you need to determine which commit introduced the error.
The git bisect start command starts the process, using the format:
1 | $ git bisect start [end-point] [start-point] |
In this example, the “end-point” is the most recent commit, and the “start-point” is an older commit, representing the range of commits where the bug might have been introduced.
Here, we’ll use the entire commit history, with the first commit (4d83cf) as the start point and the latest commit (HEAD) as the end point:
1 | $ git bisect start HEAD 4d83cf |
After running this command, the repository will switch to the commit halfway between these two points, which in this case would be commit 51.
If the code runs without errors, use the git bisect good command to mark this commit (51) as problem-free:
1 | $ git bisect good |
Since commit 51 is good, the issue must have been introduced after it. Running this command will automatically switch Git to the midpoint of the second half of the history (commit 76).
If commit 76 causes an error, use git bisect bad to mark it as faulty:
1 | $ git bisect bad |
After marking this commit as bad, Git will automatically move to the midpoint between commit 51 and commit 76 (commit 63).
Continue repeating this process until Git identifies the specific commit that introduced the bug. When it does, Git will output something like this:
1 | b47892 is the first bad commit |
Once you have found the problematic commit, inspect the code to understand the error.
Finally, use the git bisect reset command to exit the bisect process and return to the most recent commit:
1 | $ git bisect reset |
You can now begin fixing the bug.
Related References
- Title: Git rebase and bisect
- Author: LHT
- Created at : 2022-06-02 06:10:00
- Link: https://blog.327774.xyz/2022/06/01/git/Git rebase and bisect/
- License: This work is licensed under CC BY-NC-SA 4.0.